When it comes to moving sites from one host to another, it often can be tedious and doesn’t work out to plan. This guide will guide you with screenshots on how you can move a fully functional WordPress site from one host to another.

Since we are moving WordPress, we can assume that both the old and new host have PHP, MariaDB and likely phpMyAdmin as well. If they have cPanel, Virtualmin or other graphical user interfaces, that will make the migration easier with importing files and the database.
The next thing to consider is the type of website you will be migrating. This guide is applicable for any WordPress site however, some sites may be problematic after moving which we will also discuss in this article.
Let’s get started.
1 Exporting the data
A WordPress installation consists of the core WordPress files and a database. All of them work hand in hand so we will need to export both the site files and the databases.
The files can typically be accessed from your old hosting provider’s file manager. If they have cPanel, it will be there however it may also be named something else. If there is no file manager or you would prefer to do this differently, the next best thing to do would be to download files using FTP. For this guide, we will assume that you have FTP access to the old hosting provider.
1.1 Getting the FTP credentials and connecting to the server
If you are unsure on how you can get these credentials, you can contact your host’s support and request for the following:
“Hi there, can you provide me with the FTP hostname, FTP username and FTP password for my hosting service “yourhostingservice.xyz”. Thank you!”
An example of what you may submit as a support request ticket.
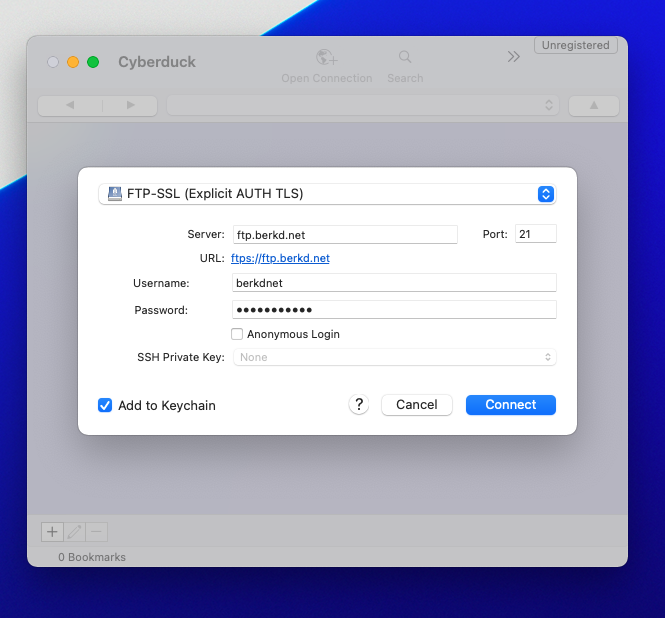
After you have done this, open up a FTP client. A popular one many folks use is called “FileZilla”. For this example, I’ll be using CyberDuck

After you have connected to the server successfully, you want to find the “public_html” folder. If your host does not have this folder, it may be called “public” or “www”. What you want to do is either compress all the files you see or, simply download them to your computer.
You can treat this as a backup but also the files we will be moving to the new server.
1.2 Exporting the database
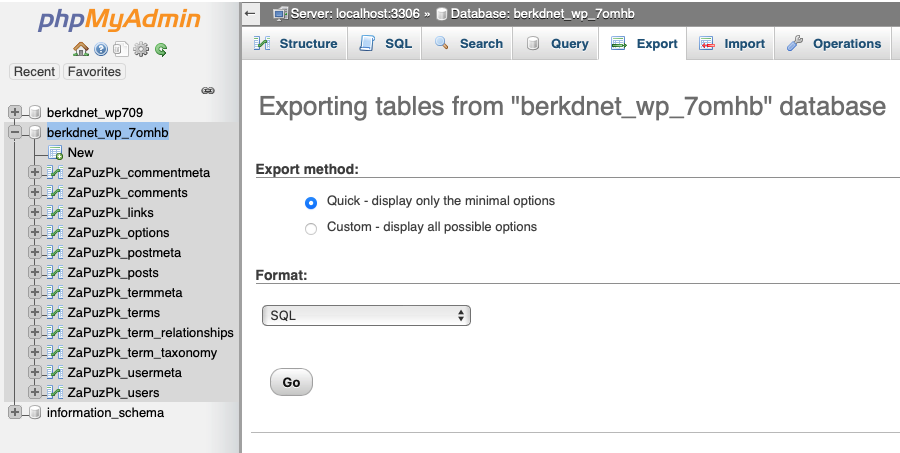
For this one, if you have access to phpMyAdmin, what you can do is export the database directly from there. Before you do this, you want to make sure that you know what the database name is. This isn’t necessary if you only have one site however, if you have multiple sites (or WordPress installations), you will need to make sure that you are exporting the right database.
The way you can find this is by viewing/editing the “wp-config.php” file and find the “DB_NAME”. That will tell you the current DB name. You want to note down the “DB_USER” and “DB_PASS” as well.
If you have phpMyAdmin access, you want to click on your database and then click on the “Export” tab to export your site.

If you do not have access to phpMyAdmin, you may want to ask your host to export the database for you. You can write your support ticket as follows:
“Hi there, can you please export the database and provide it to me as a downloadable link / attachment? The domain name is “YOURDOMAIN.XYZ” and my database name is “YOUR_DB_NAME”. Thank you!“
An example of what you may submit as a support request ticket.
2 Importing the data
To import the files to the new hosting service, first copy the files into the new “public_html” directory at your host. If you are doing this for an addon domain name (e.g. a subdomain), then put the files in the document root of that sub/addon domain. This can be done through a file manager like cPanel or, you can connect to the new host over FTP and do that way.
After doing this, the next step is to import the database. If you have access to phpMyAdmin, you can import the database using the “Import” button (see figure 2) or you can ask your hosting provider to import it for you.
2.1 Importing the database
When it comes to the database, there is an important note to make here.
If the database has been imported at the new host, take note of the database name as it may have been updated to something else. If so, note that down as you will need to make some adjustments to your “wp-config.php” file.
The next step is to create database users which can be done within your hosting service’s MySQL/MariaDB portal. You should be able to create a DB user and give it a password. If there is already one created, you can use that however, be sure to note down the username and password.
The final step is to ensure that the database user is connected to the database itself. This functionality will be in the hosting portal (e.g. cPanel or similar) however, if you do not have this functionality, you can request your hosting provider to do this for you. Simply ask this following in your support ticket:
“Hi there, can you please add attach my database user to my database with the correct privileges? The database is “YOUR_DB_NAME” and the user is “YOUR_DB_USER”. Thank you!“
An example of what you may submit as a support request ticket.
2.3 Updating “wp-config.php”
At the new host, what you want to do is edit the “wp-config.php” file and make sure that the database that was migrated over and the username are updated. They should match what was created at the new host.
To edit the “wp-config.php” file, it can be done through FTP or, you can do this directly from your hosting control panel (e.g. cPanel File Manager).

Let’s move onto testing the site!
3 Testing the site
With WordPress sites, the best way to test the site without making it live just yet is to use a method known as the “hosts file”.
In simple terms, this allows you to skip the DNS altogether and point the domain name to a server’s IP address.
If you would like to know how you can hosts file your site, please refer to this handy guide created by HowToGeek: https://www.howtogeek.com/howto/27350/beginner-geek-how-to-edit-your-hosts-file/
For example, if I wanted to host file my website, “tekbyte.net”, it will need to add something like this to my hosts file:
194.195.249.25 tekbyte.net www.tekbyte.net4 Updating the DNS
If you have tested your newly migrated site and it is all working nicely, the next step is to update your DNS. This will likely be done from the place you are managing the DNS from. In most cases, it will be your registrar but it may also be your host. The way you can find out is by doing a nameserver lookup.
To do this, use the following link and simply enter your domain name and click on “NS” from the dropdown.
- WhatsmyDNS: https://whatsmydns.net
All it involves is updating the root domain A record and ensuring that the “www” record is also setup correctly. In some cases, the “www” record is a CNAME but it can also be an A record. I have provided an example below.
Record Type: A
Host: tekbyte.net
Value: 194.195.249.25

Record Type: CNAME
Host: www.tekbyte.net
Value: tekbyte.net

NOTE: You want to replace the IP address with your hosting provider's one.
That’s it! Once you have updated your DNS, simply allow a couple hours for the DNS records to propagate and you should be good to go!
The Alternative
These days, most developers will migrate their sites using plugins like “AIO WP Migration” or “Duplicator”. The reason being is that they save a lot of time and can make migrations effortless as they export all the primary website content files and the only thing the user needs to do is install the plugin on a fresh WordPress instance and restore the backup generated by the plugin.
This article is aimed at people who want to know what it takes to migrate a site manually and what you would say to a hosting provider’s technical support team if you’d require assistance.
Common Issues
After a migration, if you notice issues with your site not loading, there are a number of things to check. I will address the most common ones now:
Error establishing a database connection
This is a common one which pops up and it can mean any of the following:
- The database credentials in the “wp-config.php” file are mismatched
- DB user permissions are not set up
- MySQL service is down (i.e. mysqld is down at the host)
White screen of death
Check the .htaccess and also the “error_log” file. If you notice the issue is related to a plugin, go into the “wp-content/plugins” directory and disable the plugin that is causing the issues. All you have to do is rename the folder (e.g. ‘wordfence’ –> ‘wordfence_disabled’).
Also, check your .htaccess file and remove any PHP AddHandlers as that will clash your new hosting provider’s PHP version
Error 500
Often related to the PHP version. You may want to ask your hosting provider to upgrade or downgrade the PHP version for your site. This is often the case with old sites which need to use older versions of PHP (e.g. 5.6 or older).
Error 503
This one is typically resource issues. That can be rectified by checking the current resource usage (you can ask your hosting provider for support). If you have a heavy eCommerce site, you may want to consider asking for a CPU, Memory or I/O increase. Sometimes the number of processes can also cause troubles.
Error 403
This one can be related to the following:
- Firewall block (IP related)
- Mod Security firewall block (often triggered by plugins)
- .htaccess file
- Plugins (e.g. WordFence).
- File permissions
With server status codes, hosting providers can often rectify this issue for you.
Conclusion
To summarise, migrating a WordPress site requires doing the following:
- Export the WordPress files and database
- Import them to the new host
- Ensure that the “wp-config.php” file has been updated to reflect any changes at the new host
- Test your site
- Update your DNS
Hope you found this useful!


