Launching KeyVault 2FA App for iPhone, iPad, Apple Watch & Mac!

After months of hard work, I am pleased to announce KeyVault which is a fast, secure and modern 2FA app designed for Apple devices. After trying various 2FA apps, I wanted to build my own for the following reasons:

  • Support for all my Apple devices (i.e. iPhone, iPad, Watch, Mac)
  • Lightweight
  • Aesthetic
  • Customisable with categories

I have thrown some extra features into the app to appeal to a greater audience such as independent PIN/biometric locks, import/export backups and themes. Combining simplicity, security, and seamless functionality, I want KeyVault to be the ultimate companion for safeguarding both personal accounts and professional data.

Screenshots

Features

🔐 Store All Your 2FA Codes
Keep all your 2FA codes in one secure location. No more switching between apps or relying on unsecure notes.

🔎 Manually Add 2FA Codes
Take full control by adding your codes manually. Organize your data just the way you like it.

🔦 Scan 2FA Codes with Camera
Easily scan QR codes to add your 2FA codes in seconds. It’s quick, intuitive, and hassle-free.

🗃️ Sort and Organize Codes
Stay on top of your security by sorting codes alphabetically or by frequency of use. Access your codes faster and more efficiently.

☁️ iCloud Sync
Enjoy the convenience of iCloud sync to access your 2FA codes across all your Apple devices. Your codes are always at your fingertips, no matter where you are.

📥 Import & Export Codes
Seamlessly transfer your codes when switching devices. KeyVault OTP makes importing and exporting effortless.

📲 Apple Watch Sync
Take convenience to the next level with Apple Watch integration. Access your 2FA codes right from your wrist.

Pro Features

📁 Categorize Your Codes
Group your codes by category (e.g., Work, Personal, Banking) for an organized and streamlined experience.

📂 Create Custom Categories
Tailor your organization by creating unlimited custom categories to suit your unique needs.

🎨 Custom Themes
Personalize KeyVault OTP with 10 stunning themes. Add a touch of style while managing your security.

🔒 FaceID/TouchID and PIN Protection
Boost your security with biometric authentication or a PIN. Your data stays protected, always.

Get smooth scrolling in Safari and other apps with “Mos”

If you are someone who uses Safari and uses a mouse that isn’t the Magic Mouse, you may have noticed that Safari doesn’t actually “smooth scroll”. What I mean by this is that Safari doesn’t render scrolling like Chrome, Firefox or Edge but instead, only works well with the Magic Trackpad and the Magic Mouse.

This unfortunately is a bummer as Safari works incredibly well when used across other Apple devices (i.e. iPhone, iPad).

To resolve this first-world problem, I came across a free program called “Mos” which allows you to implement smooth scrolling across all macOS applications.

The result is truly remarkable as it means whenever I scroll in Safari, Xcode and any other application for that matter, the experience is amazing.

I’ve made my scrolling behaviour feel almost like Microsoft’s Edge browser (subjective but I think it feels AMAZING).

My Settings

Here is a quick look at my settings

Just the standard settings, I also use LinearMouse which allows me to have universal back/forwards and this works incredibly well too.

By default, the settings are different but to have it suit my style of scrolling, I am using the values shown. This gives it a very MS Edge-like scrolling experience (which I like).

Installation

This is a fully free and open source application and to install it, you can simply run the command below (assuming you have “brew” installed):

brew install mos

I highly suggest also checking the project page for more information on all of the other features it offers.

Improving the external monitor experience on macOS

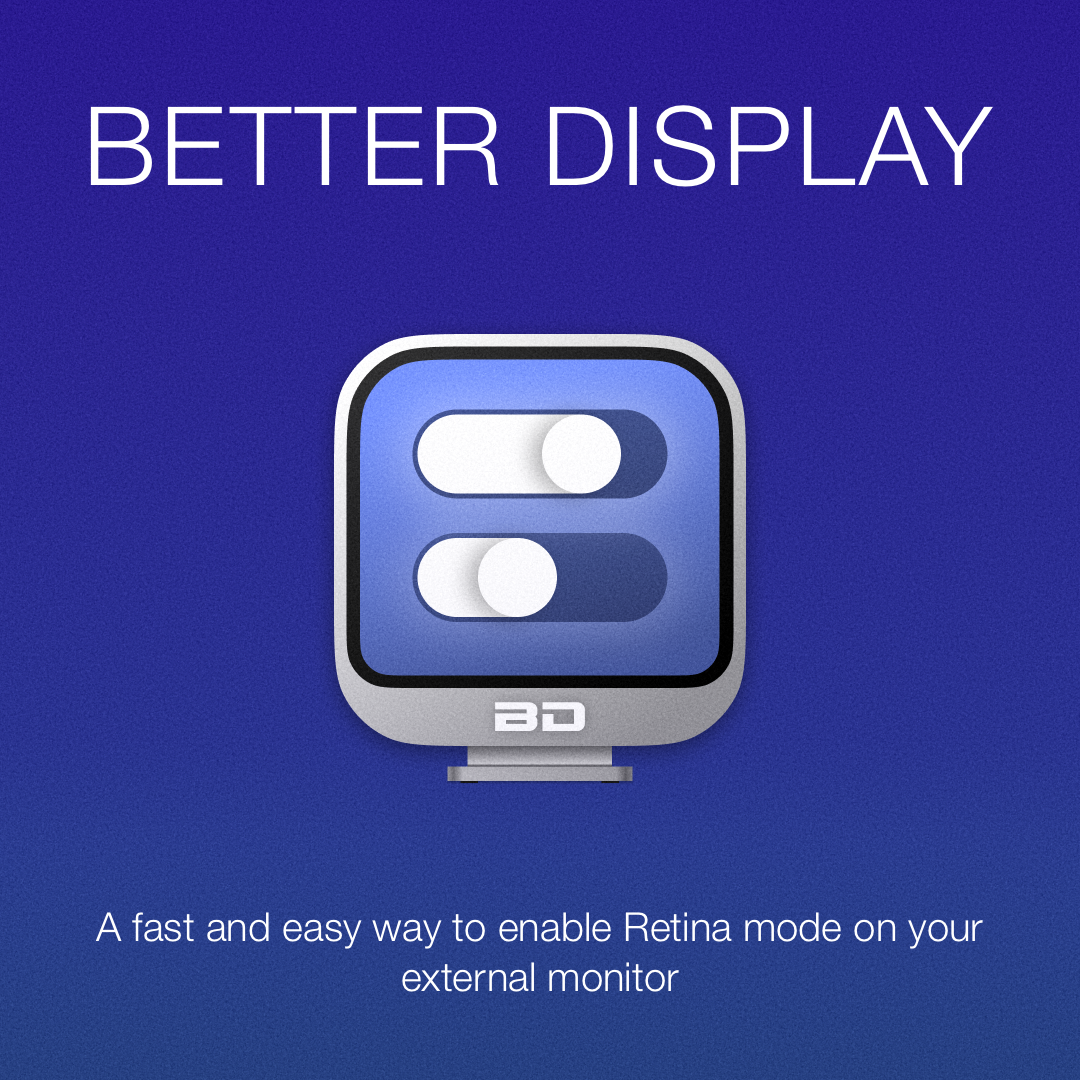
Having switched to macOS for my day-to-day computing as Xcode is a requirement for me, I naturally use an external display along with my MacBook Air as I need the larger display from a productivity and ergonomic perspective.

I currently use a Dell 27″ “S2721DS” 1440p display which has been serving me well for the past few years. It’s no Studio Display but it definitely gets the job done and the colours are fairly accurate and has good viewing angles thanks to an IPS panel.

When I was using Linux, the display was as you’d expect, pretty normal and font is rendered just fine however, after using a Mac, I realised that macOS is very picky when it comes to what resolution is being output as anything that isn’t a “Retina” display is typically a hit or miss.

The Dilemma

According to various sources online, if you want the ultimate external monitor experience, you need to go for something that is 5K due to how macOS handles scaling. So if you can afford it, I’d go with a Studio Display as it also comes with really good speakers from what I hear (pun intended 😉

If you go with any other monitor like myself, most folks recommend 1440p as it scales really well at native resolutions without any modifications.

However, I quickly found out that if I want sharper and smoother text and also fix the dredged pixelation when gaming at a lower resolution (yes, I play ETS2 on my Mac :D), then you need to use a tool called “BetterDisplay”

What is BetterDisplay

BetterDisplay is a tool that lets you convert your displays into fully scalable screens, create custom resolutions, control your brightness/HDMI audio (e.g. CEC) and much, much more.

It’s an extremely extensive program which is frankly, overpowered but I use it for two things:

  • Scale my 1440p display down to view text more comfortably + gain “Retina” feeling text
  • Control external monitor brightness via my keyboard
As you can see, I am running my 1440p display at a scaled “down” resolution of 2048×1152. This does make the elements appear larger and probably takes a toll on the GPU however, as I am mainly productivity first with my computers, this makes everything very much more pleasant to look at.

You can actually adjust a lot and even enable HiDPI (Retina display experience), on just the standard 1440p but I found that this resolution is the sweet spot for me.

Plenty of adjustment available

I also find myself working at night and having the ability to control the displays brightness via my keyboard is very convenient.

Showcasing the ability to control brightness using the keyboard. Typically done using F1 and F2 on macOS layout.

If you’re after a way to spice up the way elements are rendered on your external monitor, I recommend giving BetterDisplay a go!

My must-have macOS utility apps for 2024

I have recently moved to a MacBook Air M1 for mobile app development as it allows me to develop for both iOS and Android and is a solid upgrade to my ThinkPad E480.

I come from a Linux background so naturally, I like to make things work for me and because of this, macOS at first felt very un-natural to me however, there are a few apps I have discovered that make the experience much more enjoyable and to the point where it surpasses my Linux experience in many ways.

In this article, I will be sharing some of the apps (mostly open-source) that I found which helps make macOS more for power-users. Some of this is not necessary for a lot of people out there however, for me personally, they make a world of difference.

Clipboard Manager – “Maccy”

Having a working clipboard manager is a must for me. It needs to be one that allows me to paste without formatting, is efficient on resources and ideally open-source as it would hold sensitive data (e.g. passwords) albeit temporary.

Screenshot from Maccy (https://maccy.app)

I have found one called Maccy and it works really well! Give it a go.

Mouse Optimisation – “LinearMouse” and “Mos”

These two apps are a must-have for me. I have tried to use the Apple Magic Mouse and I do keep it around for on-the-go use however, the sensor and shape is less than ideal for me. I have tried some Logitech Mice too which work well on other operating systems however, the Bluetooth connection tends to lag on macOS (i.e. the polling rate is less than 90Hz which makes it feel sluggish).

I am currently using a SteelSeries Rival 3 Wireless which can be used in both dongle and Bluetooth mode and it works really well. I run it on the lowest polling rate to save on battery with LEDs off, I get a max polling rate of 145Hz which is perfect for daily use in macOS (I am not a big gamer).

However, there is one caveat of using a non-Apple mouse and that is the side-buttons won’t work and mouse acceleration. These two issue are resolved with the use of LinearMouse which allows you to adjust acceleration, sensitivity but also enable universal forward/back buttons which is a must for me.

Plethora of options are available for Rectangle

I also discovered Mos recently which allows me to implement smooth scrolling in all apps and it works really well. It was sad knowing Safari would only have smooth scrolling if you use a magic mouse but I want to use something else and Mos allows me to make Safari absolutely perfect. 👌

My current Mos Mouse configuration – it gives it a nice MS Edge-like scroll feel.

Moving windows around – Hummingbird and Rectangle

Rectangle is an app that allows you to snap your windows to corners on your desktop — something that macOS should be able to do by default (even the iPad can do this). It’s a free and open source app and it’s the first thing I install.

A basic app but can be customised quite a lot.

Hummingbird is a new discovery for me which allows me to move windows around without having to click on the top bar (i.e. I can put my mouse on the window, press “CTRL+OPT” and simply move it around, no clicking required. And if I press “CTRL+OPT+CMD” together, I can resize the windows.

The reason why I love this app is because I am very used to resizing and moving my windows around with “SUPER+Left Mouse” in Linux but macOS doesn’t have this feature out of the box. Hummingbird is a game changer for me and makes window management even easier.

A simple yet super effective app. Hasn’t been updated in a while but still works like a charm.

I also wanted to try out Yabai but having used tiling window managers in the past, it breaks my workflow so I prefer the floating.

Keep Mac Awake – Amphetamine

This is a simple app that works like “caffeine” on Linux (e.g. a GNOME extension) but allows for more granular control (e.g. set up timers for how long you should have caffeine) — simple but effective.

Windows-like Alt-Tab Behaviour – AltTab

I normally use “CMD+TAB” but the default behaviour is to not bring the application to the foreground which is annoying and I have to do “CMD+TAB,OPT”.

This is fine however, there is a nice addition that also allows me to switch to multiple windows of the same app with ease (akin to using “CMD+TILDE”) — and this is AltTab!

It also comes with a load of additional features so it is a nice addition to my Mac workflow.

Status Bar Management – Bartender 5

This is a paid app but I believe it’s a must-have, especially if you decide to install everything mentioned here! 😀

I usually use the basics but it can be customised quite a bit.

Bartender allows you to clean-up your status bar and keep it looking minimal, similar to how Windows has a “tray”, macOS doesn’t have one by default so in order to have a clutter free top-bar, Bartender comes to the rescue.


So these are some of the apps I use on my Mac and it’s made the transition from Linux much easier and dare I say, more enjoyable. There are things I miss daily that I could do on Linux but Mac being a UNIX system underneath means that everything feels mostly the same aside from the desktop environment. So there really isn’t much to brag about macOS but when you have nice Apple Silicon powered hardware and have a few Apple devices (e.g. iPhone, iPad), it works wonderfully.

I will also share some of my favourite extensions for Safari too in an upcoming article, thanks for reading, hopefully it has inspired you to spice up your own macOS installation.

The ultimate GTK 4 terminal – Black Box

I use terminal emulators daily on my main machine and my go-to has always been GNOME Terminal however, that is until I found a new program called “Black Box”!

This is a short article to shed some light on the new contender as I believe it’s worth checking out if you’re on a GTK/GNOME-based desktop environment.

I am a long-time GNOME user as I’ve had a soft-spot to how things work and have been loving the keyboard-centric workflow. I also really enjoy KDE Plasma and other desktop environments however, GNOME has always had a special place in my heart due to how things work. While there are a lot of things that need improving in the GNOME world, the terminal has always been adequate for my needs but seeing how other

Terminal Padding

As GNOME Terminal is a GTK 3 application, I would place the following CSS file into my ~/.config/gtk-3.0/ and it would give me some aesthetic terminal padding.

/* gtk.css
 * Add padding to terminal.
 * Place this into the "~/.config/gtk-3.0/gtk.css" file
 */

VteTerminal,
TerminalScreen,
vte-terminal {
    padding: 10px;
    -VteTerminal-inner-border: 10px;
}

While this doesn’t add anything from a functionality stand-point, it does make the terminal a nicer place to be in. However, there are other appearance related things that are a bit lacking (e.g. coloured CSD/titlebar, seamless scrollbar). These are just purely cosmetic but if I was to spend many hours in the terminal, why not have something nice to look at? 🙂

Black Box vs GNOME Terminal

Here is a quick look at the difference between Black Box and GNOME Terminal.

On the left, you can see Black Box which can be themed very easily and also colour’s the CSD (i.e. titlebar), similar to what iTerm 2 looks like on Mac. 🙂

As for GNOME Terminal, it still looks very good however, the plethora of options available in Black Box is a bit nicer.

Here is a quick look at some of the settings it offers:

As you can see, there are the standard settings you would expect but also a very nice colour scheme picker where you can also import your own styles too.

It should be available on most distribution repositories but if not, you can always download it from Flathub as a Flatpak.

That’s all for now. 🙂

Audacious – The ultimate music player for those who want Nostalgia

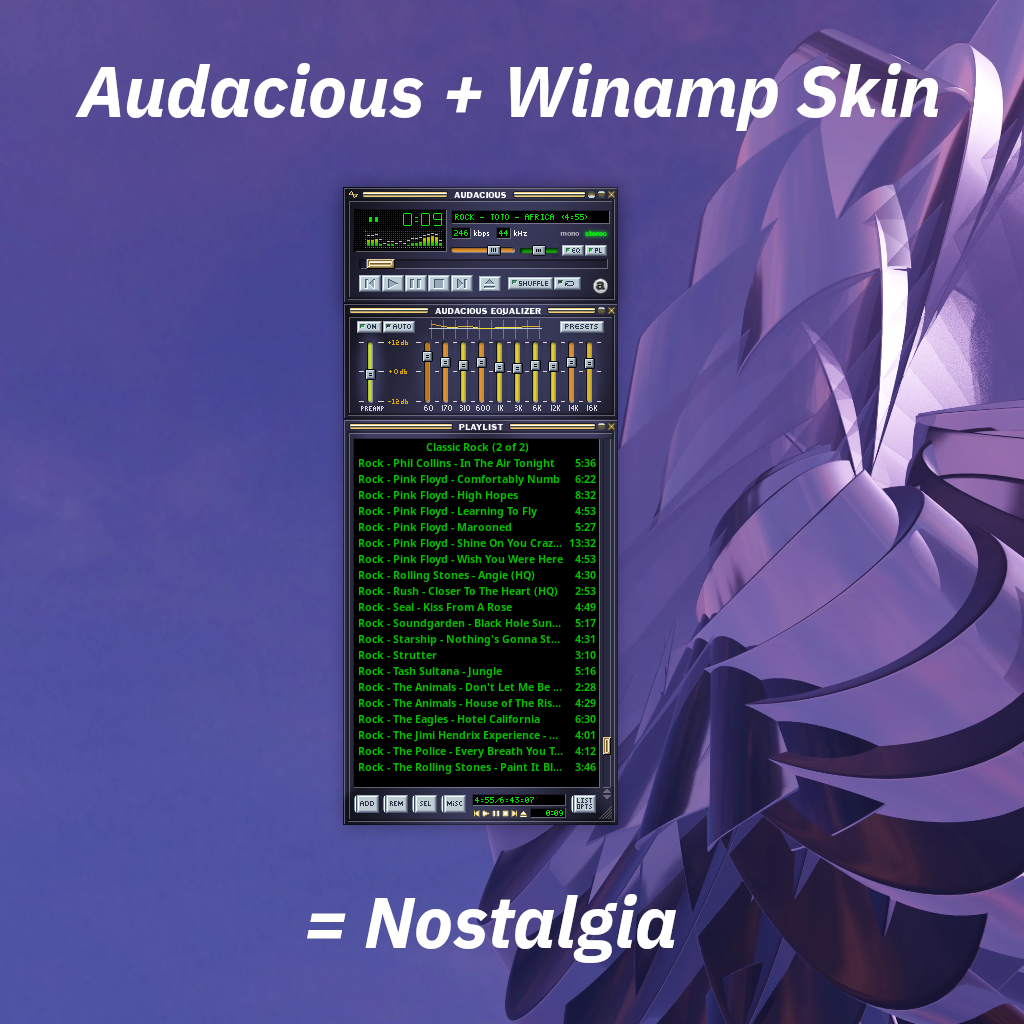
Just wanted to put it out there, if you’re someone who grew up with Winamp but you’re on Linux and want to experience the same good-old feels, then look no further than Audacious!

Out of the box, it looks pretty standard but once you enable the Winamp classic interface and apply the Winamp skin, it’s simply awesome!

The good old days. :’)

How to apply the theme?

Firstly, install Audacious from your desired package manager. I went the default RPM route on my Fedora install so for me, that would be:

$ sudo dnf install audacious

Once installed, open the application so the configuration files are all loaded, and now download the following XMMS skin:

Also, for those on KDE Plasma and other Qt based desktop environments — you may want to consider QMMP but do note that Audacious also has a Qt mode. 🙂

Once downloaded, move/copy the file into the following directory:

/usr/share/audacious/Skins

For me, it would look like this:

This is where all of the Audacious skins are stored.

Now, you can enable it:

Enjoy! 🙂

Switching to UTM: Goodbye Parallels

Switching to UTM: Goodbye Parallels

As many people in the macOS virtualisation world know, Parallels is very expensive virtualisation software but it also is the defacto solution due to its incredible support of 3D graphics acceleration.

I used Parallels for games as there were certain titles that didn’t run on Apple’s M-series powered computers. However, I have been phasing out gaming from my life to focus on other areas (e.g. app development). Because of this, I didn’t require a powerful gaming PC or virtualisation/emulation (e.g. Parallels or CrossOver) as the occasional game on the iPad was sufficient. Because of this, my requirement for a fast VM dropped significantly and in return, saves me $139.00/yr AUD.

I still need the occasional Linux or Windows VM to run a specific program without affecting my Mac install — and after searching online for a solution, I have settled down with UTM.

What is UTM?

UTM is a powerful free and open-source virtualisation software designed for Mac. It makes use of QEMU to virtualise but also emulate x86 environments. I found this to be excellent as it allows me to run an older operating system where ARM/AARCH64 support is not there (e.g. Windows XP 😉) – this is called emulation.

However, the virtualisation side of UTM is also very good. It allows me to run Fedora Linux relatively well and Windows 11 ARM also runs decent enough for any Windows needs.

UTM running on macOS Ventura

Is it worth it?

The only caveat with UTM is the lack of 3D acceleration but if you do not plan on playing games or running applications where low-latency is a requirement, UTM is perfect!

UTM is also free but I have bought it through the App Store to support the developers.

Please note though, it is slower than what you would expect with Parallels or even VMware Fusion, however, if your Mac does everything you ask it to do and you just need the occasional VM to run a Windows specific program, UTM might be what you are after.

Adventures in React – #1 A New World

As you probably know, Swift has been incredibly fun to work with and I am still using it for maintaining and writing some new apps that are for iOS/iPadOS (more info in the future).

However, I have been pushing myself to learn React Native now to enable myself for potential job prospects and also dive into cross-platform app development using modern web technologies. My workplace also uses it, which is why I want to work with React + React Native.

Coming from a low-level programmer background in university (e.g. C/C++, Assembler for Atmega and RISC-V microcontrollers) but also a period of learning Java for Android mobile development, these languages have been a breath of fresh air for me and seeing what is possible is very exciting!

Swift and SwiftUI have been simply joyful to use, I love it.

I have been diving into React Native in the past 1-2 weeks and it has been quite fun too! I never used JavaScript but it is all quick to pick up as most languages borrow a lot of similarities from each other.

Of course, I have started with the cliche to-do list app for testing and getting into grips with styling, CRUD operations in JS/RN and also handling data saved on the server.

I have also been using Expo Go to test-run my applications and I must say, it has been very convenient to debug without a cable! And furthermore, it has allowed me to create a remote code-server on my VPS which means I can work on my React Native projects from wherever!

My code-server running the React App I’m working on (demo) — it’s a solid experience.

If you have read my previous posts, you probably know that I love using the iPad as a “do it all” machine. And code-server running in the “cloud”, accessible anywhere, has been joyful for quick tinkering when moving about. Code-server also allows me to continue working on my project from wherever and also keep the Expo server alive to do any demos.

I hope to share more once I have a nice app ready in React Native that works on both Android and iOS — I hope that will happen very soon!

Adventures in Swift – #6 Published!

In the previous article, I highlighted some of the shortcomings of SwiftUI but after some finesse and compromises, I have managed to publish my very first app onto the Apple App Store and that was done 100% through the iPad!

I will first start off with some caveats and features I had to remove from my app in order for this to work.

The upload process

Firstly, I had to enrol into the Apple Developer Program and then I could submit my app directly to App Store Connect for testing in Test Flight. I did this the day prior to submitting the app.

Thankfully, I was approved and then I started to polish my app and iron out any bugs. After doing this, I could then go ahead and submit my app for testing via Swift Playgrounds.

To my surprise, this was easier than I thought and I managed to get all of this done on my iPad as well!

Success! I have uploaded it to Testflight at this stage.

Once the app is in “App Store Connect” (I’ll refer to this as ASC), I could then start testing it on my devices. Of course, I have already done prior testing but I thought I’d try it on my iPhone as well.

The Test Flight experience was great and everything went smoothly.

Caveats

My first app had to be a cut-down version of my main one which is the “Infinity – Habit Tracker” application. I essentially repurposed my main project and made it a minimal and easy-to-use to-do list app. These are the features I had to remove:

  • In App Purchases
  • Custom Icons
  • Custom notifications

I originally wanted to publish my app with the aforementioned features however, this unfortunately wasn’t possible due to the limitations in Swift Playgrounds. That being said, having a fully-free app isn’t a major issue for me as I have ultimately achieved my goal of publishing a mobile app solely from the iPad.

Submitting the app

To give a good first impression, I designed a new app icon using Procreate on iPad, and also created some promotional screenshots to spice up the App Store presence. This can be seen on the App Store and in the next section.

Success!

After waiting almost 24 hours, my app was approved and on the App Store!

I honestly thought it would be rejected simply due to how simple the app was even though that was the intention. I’ve designed the app to be 100% open-source, built on iPad only and also offline.

Todoify is on the App Store!

I have achieved my goal of publishing an app from the iPad but now, I must resort to Xcode for anything that requires IAPs, Widgets, Apple Watch Support, etc. But making simple apps on the iPad is definitely possible.

If you are looking for a minimalist, simple and offline to-do list app, check out Todoify! 😊

Adventures in Swift – #5 Ready to Publish + Reality of Swift Playgrounds

I have finally come to the end of my mobile app, Infinity, which has been a great learning experience in Swift, SwiftUI as well as getting my hands dirty with Git. Overall, it has been an excellent journey and developing on my iPad has been great fun for the most part!

However, the last 30-45% of my app was imported and developed all in Xcode because Swift Playgrounds was limited when it came to adding more functionality to my mobile app.

I was ready to cut some features out just for the sake of publishing directly from iPad however, it quickly became apparent to me that Swift Playgrounds is only really good for basic apps or prototyping (i.e. start messing around with Swift Playgrounds and then move on to Xcode).

That being said, this isn’t a bad thing per-se. I will share my plans for Swift Playgrounds shortly and what I believe it is good for in it’s current state with iPadOS 16.

So you might be wondering, if Xcode can do everything and do it well, why not just start with Xcode?

The use case for Swift Playgrounds

Well, for someone like me who has a Mac Mini at home and iPad Air for on the go computing paired with a Logitech Folio Touch, it’s basically like a mini MacBook! For me, it does everything I need it to do however, I really hoped that I could use Swift Playgrounds for more complex applications and I will share my wish list on what I would want the app to do.

The real reason why I had to switch away from Swift Playgrounds because I couldn’t implement the following:

  • Test IAPs (i.e. proper StoreKit files (library works)
  • A proper build/asset manager (e.g. making custom app icons possible)
  • Version control (this, I can live without as I was using Working Copy as a workaround).
  • WidgetKit development
  • Apple Watch development (ok, this is asking too much but it would be cool 😃)

The first two are the most important and I think if we had support for that implement, it would be honestly perfection. For version control (i.e. git), I was using Working Copy + Textastic to import my code into my Github repo but it was very manual and involved a lot of copy-pasting. Having proper git support would be perfection.

I guess what I am asking for is Xcode on iPad which would be nice but perhaps are more watered down version (i.e. one that nails down the absolute basics enough for new and professional programmers). I’m not asking for CI/DI but let’s say, Swift Playgrounds Pro.

What can I use Swift Playgrounds For?

Well, you can use it for testing, quickly prototyping a new app or even just creating basic free apps which you want to deploy to the App Store. I might actually create a fully-free app that can be developed in Swift Playgrounds (e.g. something based off my Infinity App) as the Infinity App itself was made mostly with Swift Playgrounds.

The iPad does just about everything for me so I won’t call it quits just yet as iPadOS only really started to get good in the past few major updates (since iPadOS 14?). There are rumours that iPadOS 17 will bring even more goodies to the iPad so I am hopeful that in June’s WWDC event, we will see some improvements to the Swift Playgrounds app. This would be absolutely epic if that’s the case! 😃

My app in Swift Playgrounds

Having completed about the last third in Xcode, I then reimported all of the code into Swift Playgrounds and it still worked just fine. The only issue was StoreKit not working properly which is to be expected. There is also an issue with setting up a custom app icon. Again, this isn’t a crucial feature for most apps but thought I’d mention it.

Conclusion

To give where it’s due, I am very happy with Swift Playgrounds thus far. Like come on, who would have thought an iPad could develop apps? Like sure, it isn’t Xcode but it doesn’t mean you can’t do anything with it. I think it excels in creating basic prototypes and if you are just developing apps that are free and for fun and not doing anything too serious, Playgrounds it’s perfect for that!

I’m thinking of creating another project and publish a totally free app that is built purely with Swift Playgrounds. I’ll probably write up another article about that soon!

Let me know what your thoughts are below!

I hope for the day where I can completely replace my Mac with iPad because in my eyes, the iPad is the peak computing device.